
Here you can find tips on getting started and creating good quality prompts for your organisation. We recommend which prompts and organisation needs, which agencies to use as well as show how to do that.
Recommended prompts to get you started
It is recommended to create the following types of prompts by a professional voice actor.
| Prompt | Example |
|---|---|
| Welcome greeting | Welcome to the Sawmill sharp chain. |
| Company closed | At the moment we are closed. Our office is open from Monday thrue Friday from 9 until half 6. Is it urgent? Please press 1. |
| “You are now connected” | You will now be connected to one of our employees. |
| All employees are busy | All our employees are busy at the moment. One moment please. We will help you as soon as possible. If you prefer not to wait, then dial 1 to leave a voice message. |
| Not available | At the moment we can not help you / we are not in a position to answer your call. |
| Company voicemail greeting | This is the voice mailbox of Bakery CookieDough. |
| Voicemail message | You can leave a message after the tone. On office hours you will be contacted as soon as possible. |
| IVR choices for specific menus | company-specific |
| User’s DND enabled | The user is currently on a call or in a meeting and can not be disturbed. Press 1 to continue waiting, Press 2 to leave a voice message. Or call back later. |
| User no answer | The user is currently not at his desk or not reachable. Press 1 to redirect to the mobile phone. Press 2 to leave a voice message. Or call back later. |
| Holiday message | Due to holidays we are closed. Look for the current opening hours on our website.com/holidays. Is it urgent? Please press 1. Do you want to leave a voice message, press 2. |
List of voice over agencies
- dedacom.nl 1
- voicebooking.com
- stemmenbestand.nl
- voicearchive.nl
- intervoiceover.com
- premiumvoices.com
How to ensure same sound levels on all the prompts
To ensure that you have prompts that always have the same sound level, you have to normalize them. To ensure an even better recording you also have to remove background noise. We will explain here the step-by-step process of creating a good quality prompts for your organisation.
Setup
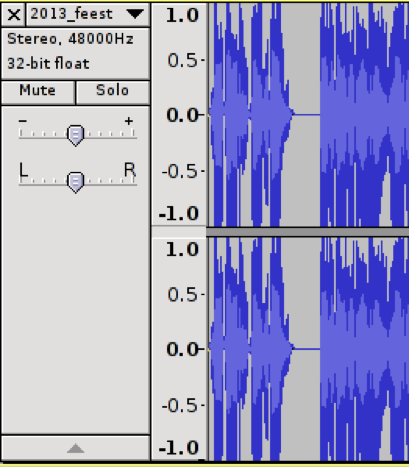
Before you begin, you must first do a check wether the prompts were recorded correctly. When a prompt is not recorded properly, you often see that there are peaks in the volume (clipping). This can be investigated as follows:
- Open the supplied WAV file in Audacity
- You can immediately see whether it is a stereo (two channels) or mono (1 channel) recording
- When the audio already has peaks above 0.7 (see example below) then you can almost be sure that they are not properly recorded. Contact your voice over agency to get it sorted out.
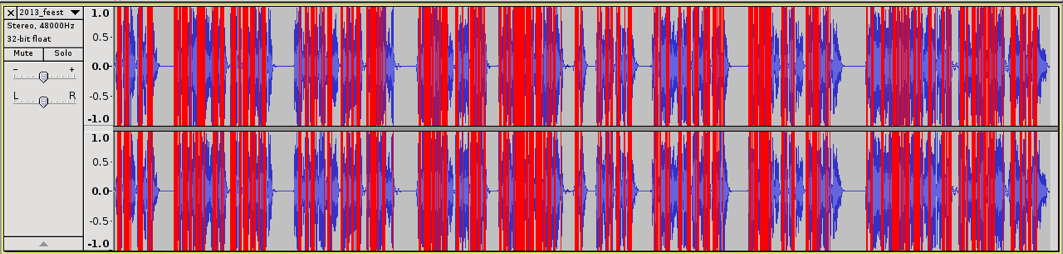
- Additionaly you can watch the clipping, go to View -> Show Clipping
- If no red lines appear all is well. When there are red lines visible, Compass will make errors while converting the audio file, resulting in bad quality prompts. An example of a bad recording is shown below.
Record and normalize audio
- Set up a voicemailbox to which anyone can call to and set your own email address to mail the voicemail recordings to.
- Sit in a quiet room
- Take a phone with which has an HD horn
- The voice over actor can now call (for each prompt) to the previously set up voicemail number.
- Make sure that at least three seconds of silence is placed before you start the prompt. So start talking three seconds after the beep
- Speak out your prompt text clearly, make sure you talk calmly and avoid different volumes and tone of voices.
- Write down each recording attempt with a number (1, 2, 3, etc.) and write donw on whether they are successful or failed.
- Download the prompt from your mail and open it in Audacity
- Go to Effect -> Normalize
- Select: Remove any DC offset
- Select: Normalize maximum amplitude to:
0.0 dB(You can also put another number to make the sound louder or softer, the important thing is that you always use the same number here) - Click on OK
Remove noise
- You can see that the entire line is stretched. It is also clear that silence is not true silence so now we have to strip it away:
- Select approximately 2 seconds of noise (found in the three seconds of silence before the prompt)
- Go to Effect -> Noise Removal -> Get Noise Profile
- Now select the entire prompt
- Go to Effect -> Noise Removal. Make sure the settings in Step 2 are as follows:
- Noise reduction (dB):
24 - Frequency Smoothing (Hz):
150 - Attack/decay time (secs):
0.15
- Noise reduction (dB):
- Click on OK
Remove silence
- Click on OK and you will see that the noise is replaced with silence
- Finally, you can shorten or lenghten (by copying and pasting silence) the silences.
- Ensure furthermore, that sounds like inhaling before a word is spoken, will also be replaced by silence
- When you have done all that you can remove the silence before and after the prompt by selecting it and pressing the delete button
- Then go to File -> Export and save the file as a WAV (Microsoft) signed 16 bit PCM
Reference ID: KB00013
-
We used Dedacom.nl agency for Talksome voices. Tanya for Enlgish prompts and Wendy for prompts in Dutch. ↩