Here you can get started with using our Flexible Provisioning Service to add and manage your own phone models and firmware
- Flexible Provisioning Service
Flexible Provisioning Service
Auto-provisioning of phone devices makes life easier for everybody: for Talksome as developers of the Compass platform it creates efficiency, for our Partners and Resellers it means less or no more on site visits, and for End Users it can lead to a smooth set-up experience of their phone device. At the background a lot of technical stuff is needed to make this work as it also involves the RPS service of the phone device manufacturer. At the same time the responsibility of making this work and keeping this up-to-date is shared by every partner in the channel.
During the years we often had discussions with partner which phone models to add and certify as well as which firmware versions to support. With a limited amount of resources this sometimes meant tough choices and longer waiting times. But as we have an API-first focus in our development roadmap we decided to implement a feature called: Flexible provisioning. This will provide increased flexibility and control for our Partners and Resellers to view and define their own phone models and manage firmware variations autonomously.
This service was introduced in Compass 2025a (January 2025) via our REST API with the availability of new dedicated API endpoints for adding customized Phone Models and preferred Firmware versions.
Applicable Scenarios
USE CASE 1 Add a custom phone type of an End-Of-Life (EOL) phone model that Talksome will deprecate in a coming release.
USE CASE 2 Add a custom phone type of a new phone model that Talksome hasn’t certified yet.
USE CASE 3 Add a custom phone type with a new(er) firmware version than Talksome has certified.
Prerequisites and References
- Understand Compass rights management structure → Resellers and Companies
- Understand the basic principles of our REST API → Compass Developers Manual
- Understand the basic principles of provisioning → See our article on Provisioning
- Check our currently supported phone models and firmwares → Compass phone support guide
- (optional) Check again what happens in the old situation when a phone would be migrated to a Generic SIP phone model → Guide to preparing phones for the conversion to Generic SIP Phone
Examples
For Use Case 1 & 2:
Step 1: Create a new phone model at the Reseller level
This can be done via API POST operation for :
/reseller/{id}/createPhoneModel (and providing the id of the reseller)
Prerequisites will be correct user rights for new phone model creation at the reseller level and the reseller ID value. You can view the fields and values of another phone model as an example via GET /phoneModel/list.
An example Request Body is provided below (please note for uncertified models ‘certified will be set to ‘false’ and for for deprecated models ‘deprecated’ will be set to ‘false’- see below):
*Note - “certified” in this context means “Certified by Talksome”. As flexible provisioning by default is not certified by Talksome - that’s why we created it - certified must be set to false for all future creations of phone models and firmware.
*Note - for this request body for SNOM devices the “shortname” should be in the format e.g. “snomD785” and for Yealink devices the “shortname” should be in the format e.g. “yealinksipt46u”.
*Note - for this request body “name” will automatically be appended with the manufacturer name provided earlier when displayed as a choice so in this case “D785” is sufficient.
{
  "manufacturer": "SNOM",
  "name": "D785",
  "shortname": "snomD785",
  "hasmac": true,
  "supportsEncryption": true,
  "supportsVlan": true,
  "instances": 1,
  "certified": false,
  "deprecated": false,
  "maxIdentities": 4,
  "buttons": 0,
  "expansionPadButtons": 5,
  "codecPts": [
    0,
    3,
    8,
    9,
    99
  ],
  "capabilities": [
    "answer",
      "hold",
      "unhold"
  ]
}
On successful execution a Response Body (via 200 code response) will generate two extra strings with the ID information (“self’ and “phoneModelId”). The phone model reference ID can then be used specifying the phone in other API calls.
In the above example case we get:
“phoneModelId”: 92, “self”: “https://rest.pbx.hostedcompass.com/phoneModel/92”,
Step 2: Verify that the new phone model is visible in the list of Phone models via API
Following the above this can also be verified via an API GET operation :
/reseller/{id}/phoneModels (and providing the id of the reseller)
{
    "phoneModelId": 92,
    "self": "https://rest.pbx.hostedcompass.com/phoneModel/92",
    "owner": 8498202,
    "manufacturer": "SNOM",
    "name": "D785",
    "shortname": "snomD785",
    "hasmac": true,
    "supportsEncryption": true,
    "supportsVlan": true,
    "instances": 1,
    "certified": false,
    "deprecated": false,
    "maxIdentities": 4,
    "buttons": 0,
    "expansionPadButtons": 5,
    "codecPts": [
      0,
      3,
      8,
      9,
      99
    ],
    "capabilities": [
      "answer",
      "hold",
      "unhold"
    ]
  }
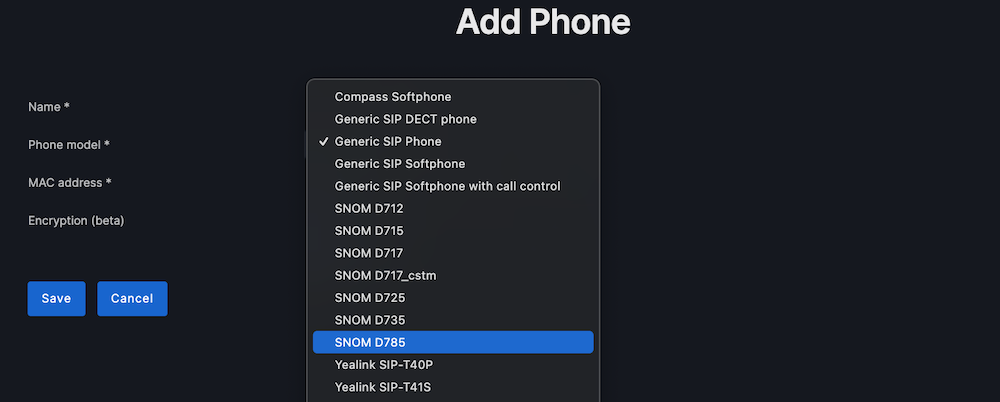
Step 3: Check if the new phone model is an available choice visible via Studio
For a specific Reseller / User this can be done using the top right menu option: Manage / Phones

Choose ‘Add Phone’ and the newly created phone model should be available as choice in the drop down list:
For Use case 3
Step 1: Identify and download the new(er) uncertified firmware
This should be done from the official and secure phone manufacturer web portal. The Firmware Version number reference should be noted as well as the required file path where the Firmware file is located (unzip the file if required).
Examples:
Manufacturer: Yealink (T4X U Series) Firmware Version: 108.87.188.1 Manufacturer: SNOM (D-Series) Firmware Version: 10.1.198.19
Step 2: Create a new Firmware instance and ID
This can be done via API POST operation for :
/phoneModel/{id}/createFirmware
Pre-requistes will be correct user rights for firmware ID creation at the reseller level and an available Phone Model ID value (see above).
An example Request Body is provided below (please note for uncertified firmware this will be set to ‘false’ - see below):
*Note - for this request body for SNOM devices the “expectedUserAgent” should be in the format e.g. “785” and for Yealink devices the “shortname” should be in the format e.g. “SIP-T46U”.
{
  "name": "10.1.198.19",
  "certified": false,
  "expectedUserAgent": "785"
}
On successful execution a Response Body (via 200 code response) will generate one extra string with the ID information (“firmwareId’). The Firmware ID reference can then be used to upload the file.
In the above example case we get:
“firmwareId”: 131,
This can also be verified via an API GET operation :
/phoneModel/{id}/firmwares
  {
    "firmwareId": 131,
    "phoneModelId": 92,
    "name": "10.1.198.19",
    "certified": false,
    "expectedUserAgent": "785"
  }
Step 3: Uploading the firmware file to a (new) firmware instance
This can be done via an API Post operation:
/firmware/{id}/file
Prerequisites will be correct user rights for firmware file uploading at the reseller level and an available Firmware ID value (see above).
In this operation there is no informational or Response Body requirements. The target firmware file can be uploaded by clicking the ‘Bladeren’ link and then choosing the file path of the target Firmware file - see below:

On successful execution an empty Response Body (via 200 code response) will be received.
Step 4: Check if the new Firmware is an available choice and is visible via Studio for a selected Phone Model
For a specific Reseller / User this can be done using the top right menu option: Manage / Phones
Choose the custom phone model type you created and to which the new custom Firmware ID and Firmware file have been added for example:

On the right hand side of the chosen phone click the pencil icon to edit the phone and the following page will open:
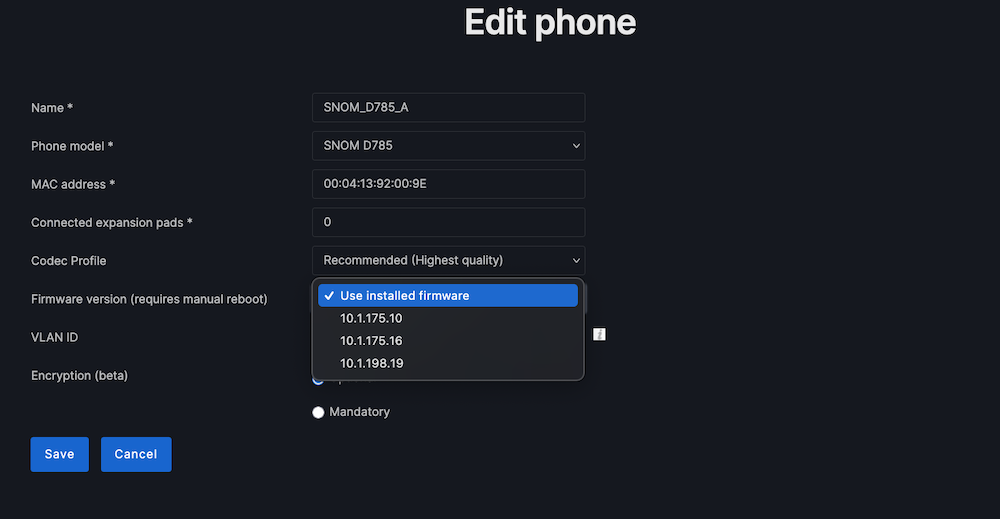
The page will include a drop down option for ‘Firmware version’ where the new Firmware will appear as selectable option.
Choose and click on the new Firmware and then press Save button.
As the page mentions the full activation of the new Firmware will require a manual reboot of the phone device.
This can be executed from the options available on the new Phone ‘Status’ page that will be reached after pressing Save above.
Note:
The following API DELETE operations can be used to remove and delete created customized phone models and Firmware variations if the corresponding ID reference is known/supplied:
/phoneModel/{id}/firmware/{id}
The following API PUT operations can be used to modify existing created customized phone models and Firmware variations:
/phoneModel/{id}/firmware/{id}